The LAMP stack (Linux, Apache, MySQL, PHP) is a group of open-source software that is often reinstalled to allow server hosting of websites (including dynamic websites) and web apps, including the Linux operating system, with Apache webserver.
The data is stored in a MySQL database (using MariaDB), and dynamic content (dynamic components) processed by PHP.
This tutorial will help you to install the LAMP stack on Centos 7 in detail.
If you do not have a VPS, you can register at Vultr.com. Vultr is currently giving $ 100 to new customers. Hurry up to register and remember to use the Vultr coupon to get $ 100 free credit to your account.
Step 1: Install Apache
Apache web server is currently one of the best-known web servers out there.
Since Apache is stored so you can install Apache in CentOS package manager, yum. Using this manager allows you to install most Centos packages.
Use the command:
sudo yum install httpd
For sudo, the above command is performed as root. Enter the user’s password to continue.
So the webserver has been installed.
Now we can start Apache on VPS :
sudo systemctl start httpd.service
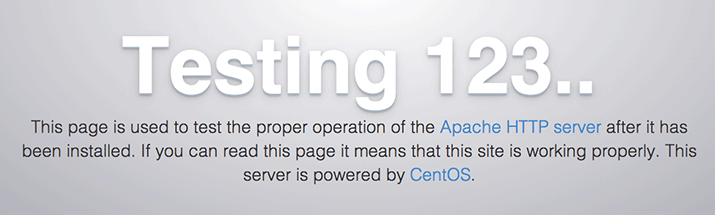
You can on-site test immediately to verify that the installation was successful by accessing the server’s public IP address in your web browser (see the section below to see how to obtain a public IP address):
http://your_server_IP_address/
The default Centos page shows:
Now install Apache to run automatically on startup with the command:
sudo systemctl enable httpd.service
How to get a server’s Public IP Address
There are many ways to do this, usually using the tool iproute2 to get the address by the command:
ip addr show eth0 | grep inet | awk ‘{ print $2; }’ | sed ‘s/\/.*$//’
You will receive one or two addresses. All addresses are available, but you can only choose one.
Another way is to get the IP address through another place on the internet because the IP address is your identifier for other parts of the network to look at.
Type the command:
curl http://icanhazip.com
Whichever way you use it, you can access the server by typing the address you just got into the address bar of your browser.
Step 2 – Installing MySQL (MariaDB)
Now that we have the webserver ready, it is time to install MariaDB, an alternative version of MySQL. MariaDB is a branch developed by the community of MySQL relational database management system. Basically, it will organize and provide access to a database where we can store data.
We used yum to remove and install the package. This time we will install more “helper” packages, which will support us with the components used to communicate.
Type the command:
sudo yum install mariadb-server mariadb
After installation is complete, launch MariaDB with the command:
sudo systemctl start mariadb
Install a few extra security scripts to remove unsafe components and restrict unauthorized access to the database:
sudo mysql_secure_installation
When asked for the password, leave it blank and press Enter. You will then be asked to add a root password. Enter the password and then press Y, then follow these instructions:
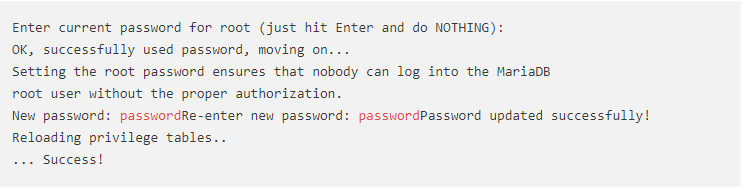
Press Enter for the following options to get the default value. This process removes some default users and databases, disables remote root logins, and reloads for MySQL to accept changes.
The final step is for MariaDB to start up with the server.
sudo systemctl enable mariadb.service
At this point, our database has been set up.
Step 3 – Install PHP
PHP is a component that will handle dynamic content. It can run scripts, connect to a MySQL database to get information, and handle processing and transfer to the webserver.
Use yum one more time to install PHP with the PHP-MySQL packages.
sudo yum install php php-mysql
Restart Apache Web Server so it works with PHP:
sudo systemctl restart httpd.service
Install PHP modules to use their functions.
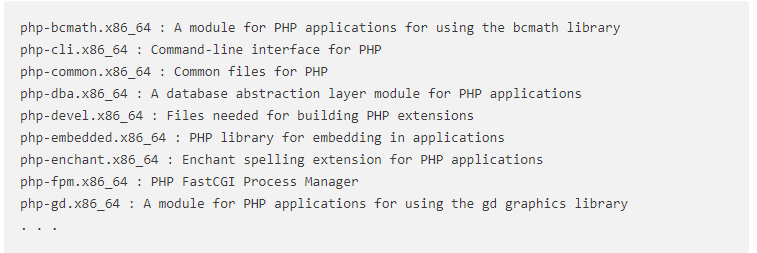
To view modules and libraries that can be installed, use the command:
yum search php-
The above command returns all modules and libraries along with a short specification about them:
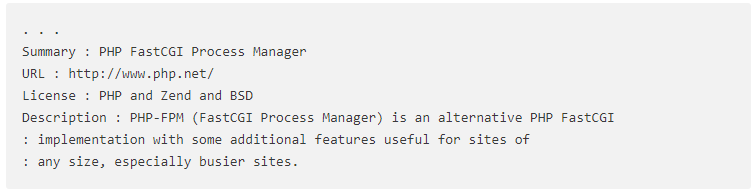
To view specific information about a module, type the command:
yum info package_name
There will be many outputs, with the field Description providing information about the functions that the module supports.
Example with the module php-fpm:
yum info php-fpm
Output:
Use the command yum install to install the package as usual, for example:
sudo yum install php-fpm
If you want to install multiple packages at the same time, use the command:
sudo yum install package1package2…
with package1, package2 … is the name of the package you want to install.
Step 4 – Test the processing of PHP on the Web Server
Create a simple script name info.php. In order for Apache to find the file and work properly, the script file needs to be saved in a specific directory, called “web root”.
In CentOS 7, this directory is /var/www/html/. Create a file in that directory with the command:
sudo vi /var/www/html/info.php
The above command creates an empty file. Add a valid script to that file.
Save and close the file.
Use the following commands to allow the firewall to allow HTTP and HTTPS messages
sudo firewall-cmd –permanent –zone=public –add-service=http
sudo firewall-cmd –permanent –zone=public –add-service=https
sudo firewall-cmd –reload
Now check that the webserver is displaying the script correctly by visiting that website in your browser.
The address will be as follows:
http://your_server_ip_address/info.php
Page display:

Now the installation of PHP has been successful.
Delete this file after testing it, as it may expose server information to strangers.
Use the command:
sudo rm /var/www/html/info.php
Recreate this page if you want to review server information.
Summary
You have successfully installed the LAMP stack on your CentOS 7 server. You already have a basic platform to install most websites and web applications on the server.
Thanks for reading my article at Kinghostcoupon.com, please leave a comment below if you need help or have a question.