Surely many people do not know what Putty software is? And how is this software used? For what purpose?
Then this article will cover as well as explain to help you better understand this software.
Putty is known as software that helps users can easily connect computers to share data and resources back and forth between connected computers. Users can easily take the data from other computers to the computer they are using, sharing decentralized data for computers in the simplest, easiest way.
What is Putty?
Putty was written in late 1988 and was officially released to users in 2000. Other operating systems such as Unix, Symbian, Android, … This is the software used to help users control servers through the internet. It supports computer user’s network protocols including SCP, SSH, Rlogin, Telnet, …
Structure of Putty software :
This software includes a number of components such as:
-Putty: Including telnet, rlogin, ssh client that can connect to a serial port.
– PSCP: a guest SCP (is a secure command-line file copy).
– PSFTP: A SFTP client (shared file transfer session similar to FTP).
– PuTTYtel: a Telnet customer only.
– Plink: a command-line interface to get PuTTY back
– Pageant: an SSH agent for PuTTY, PSCP, and Plink
– PuTTYgen: an important RSA and DSA utility
– Pterm: a standalone device simulator
This software brings features that can support computer connection, remote computer management, remote data transfer. Not only that, it provides users with SSH drivers with encryption keys and protocols, alternative encryption algorithms and authentication public keys. Besides, it can also be used to connect a serial port in a LAN.
Install PuTTY software
Install PuTTY on Windows
Download the run file (.msi format) from the link below and proceed with the installation.
You can download Putty on this link.
Install PuTTY on Linux (Ubuntu)
PuTTY is available in the repository of HDH Ubuntu, to install we use the following command:
- sudo apt install putty
Install PuTTy on macOS
The installation steps are as below
- Install Xcode
- Install Command Line Tools from Apple Account
- Open a terminal, look in the / Applications / Utilities folder, type command: Xcode-select –install
- Download and install Quartz
- Download and install MacPorts.
- sudo port -v selfupdate
- Type command: Sudo port install putty
- Type Putty in the terminal
- Create shortcut: cp / opt / local / bin / putty ~ / Desktop / PuTTY
Instructions for connecting SSH using Username and Password
To connect to a server using SSH we need the following information
- The IP address or domain name.
- Port (Port): The default is port 22
- SSH User
- SSH Password or private key file
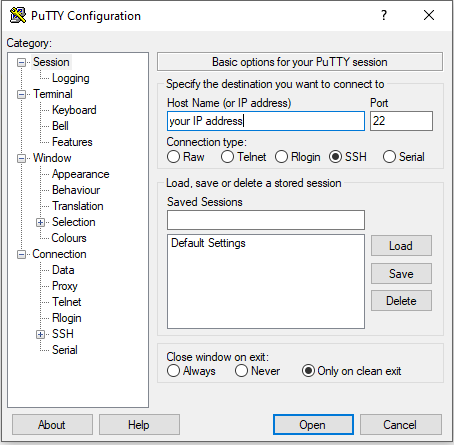
Open PuTTY and do the following:
- Select [Session]
- Enter the Host Name (or IP address)
- Enter connection information (Port)
- Click [Open] to open the SSH connection
– First, you need to download the SSH Client to your computer. After the download is complete, you can always open the Putty software without having to reinstall it.
– Then you log into the Linux server. And at the main screen of the putty software enter the IP address or the domain name to access the Linux server in the Hostname field.
– After logging in, click Open to open the connection. Note that if you have multiple servers and don’t want to enter the information, again and again, use the Saved session function. Then click Save to save and load to be able to run the sessions that you have saved or deleted to delete.
– Then the console screen appears and you must enter the password and press enter to complete. After a successful login, the system will notify you of the date and time of login and IP address of the machine you are using.
The above is our guide that can help you to access and set up the server. Hopefully, this article will provide you with the most useful information.