In the previous article, we had a tutorial on how to install the Let’s Encrypt SSL certificate for Apache on CentOS 7, in this article you will know how to install Let’s Encrypt for Nginx Webserver on CentOS 7 server.
What are the benefits of installing SSL on NGINX?
If you are still wondering about the benefits of installing SSL, you can refer to the following benefits:
- More trusted by search engines ( Google, Bing..)
- Websites with a more secure HTTPS connection
- Your website becomes more professional in the eyes of visitors
- Minimize network security problems that are extremely unpredictable
Install SSL on NGINX for free with Let’s Encrypt
If you have forgotten how to SSH into the server with Putty, you can review this article.
Step 1: Remove the previous Certbot installation packages
yum remove -y certbot
Step 2: Install Certbot
Currently, the best way to install is through the EPEL repository.
Enable access to the EPEL repository on your server by typing
yum install -y epel-release
Use the following command to download the certbot-nginx package:
yum install -y certbot-nginx
Step 3: Open the firewall port
If you are running a firewall, make sure that ports 80 and 443 are open
firewall-cmd --zone=public --add-port={80,443}/tcp --permanent
firewall-cmd --reload
Type the following command to check
firewall-cmd --list-port
Step 4: Get an SSL certificate
Install the certificate automatically with the following command:
certbot --nginx -d example.com -d www.example.com
It will run certbot with the –nginx plugin to reconfigure Nginx, use -d to determine the valid name of the certificate
Step 5: Auto-renew
By default, LetsEncrypt certificates are only valid for 90 days, so we encourage you to set up automatic renewal of your SSL certificates.
Try before executing the command (create, renew…) for real, can add the option –dry-run at the end of the command. Such as
certbot renew --dry-run
If sure, type the command
certbot renew
Note: If you type the command with LetsEncrypt incorrectly, the error is too much, it will block you from working for about 1 hour.
The automatic renewal command applied to Certbot is located in one of the following files and paths:
/etc/crontab
/etc/cron.*/*
systemctl list-timers
Set up cron jobs to auto-renew
crontab -e 0 0 15 * * /usr/bin/certbot renew --post-hook "systemctl restart nginx" >> /var/log/certbot-renew.log
This line will run the renewal command at 24 hours on the 15th of each month, then save the log to the file /var/log/certbot-renew.log for easy to viewing.
Step 6: Check Certbot working
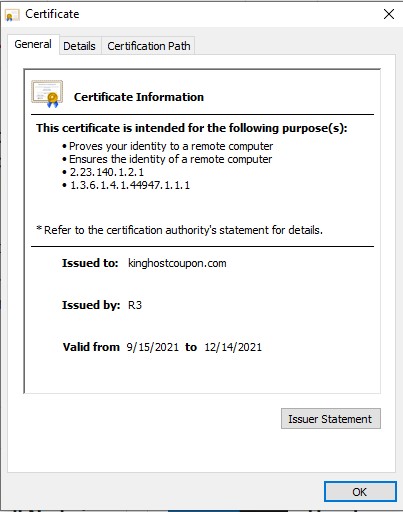
Once done, open a browser to access the domain name you just installed SSL, if you see the image below, it has been successfully installed. Congratulation!
Through this article KingHostCoupon has helped you know how to install the free Let’s Encrypt SSL for Nginx on CentOS 7. If you have any suggestions, you can leave a comment below.
You can find more information in the articles at: